Monday, April 11, 2011

Sous Vide Salmon with Fried Rice and Salad & Almost Vegan Rice Noodles Stir-Fry

It is always interesting cooking dinner at our house because we have different dietary requirements. I'm the "on and off" vegan but when I cook I am mostly vegan; my wife is doing the no carb thing to lose weight; and my step-daughter would pretty much eat anything that I put in front of her :) This evening was no exception where I ended up cooking 3 different dishes for the 3 of us. 

The sous vide salmon was inspired by a friend of mine, Ian who told me about his experimentation with sous vide fish and the great results he had with salmon. I had some frozen cooper river salmon in my freezer so I decided to give it a shot. Here were the 3 dishes that I cooked tonight:
  • Sous Vide Salmon Spinach Salad - Wife
  • Sous Vide Salmon w/ Vegetarian Fried Rice - Step Daughter
  • Almost Vegan Rice Noodles Tofu Stir-Fry - Me
First off you need to brine the salmon in a 10% salt solution to leach out the albumin. This is the whiteness that comes out of salmon with sous vide cooking. Generally you should brine this for 10-20 min max so you don't over salt the fish. Apparently I didn't do it long enough since there were some albumin leaching out when I sous vide the salmon. The albumin doesn't affect the taste of the fish at all. It is only for appearance sake.

I would also recommend using fresh salmon instead of previously frozen if you can find some in season. The next thing is to rinse the brine with clean water, dried with a paper towel, and lightly seasoned it with black peppers. I didn't season it with salt since brining will add salt in the salmon already. Add a couple of teaspoons of olive oil and then vacuum back the salmon.

I preheated the sous vide machine to 125 degrees and placed it in the water bath for about 20 minutes. The results was quite amazing! Generally after sous vide cooking the food is not always aesthetic pleasing but with salmon it's not too bad.

I then pan seared it with olive oil on high heat for about 30 seconds on each side to give it some color.

The salmon came out amazing! For my wife I placed it on a bed spinach with diced yellow bell peppers, and crumbled Boison herbed cheese. She thought the salmon was one of the best cooked salmon I ever cooked! Thanks Ian for the recipe :) 

The vegetarian fried rice is an easy recipe. I used 1 egg beaten, leftover rice (leftover is better than freshly cooked rice), and chopped Asian vegetables (Yu Choy) that I had in the refrigerator. Any type of stalk/root vegetables like string beans, carrots, peas, or asparagus would work fine too. First thing is to cook the egg with a little oil and whip as much air into it to keep it light.

Remove the egg and set it aside. Add the vegetables next with oil and add some liquid to help steam the vegetables to cook it through. The most important thing is to not over cook! 

Add the leftover rice into the wok and then add a little chicken broth. Continue to stir fry until the rice has heated through. Add the cooked egg back into the wok and season with salt as needed. I would generally add some green onion to provide a more aromatic taste. The end result is quite spectacular with or without the salmon.

Almost vegan rice noodles tofu stir-fry. Since I'm vegan today I decided to make this stir fry for myself. I took some wide rice noodles that I purchased at one of the Asian markets a couple of days ago and separate them in strips.

I then chopped whatever vegetables I had in the refrigerator - today's veggies happened to be Chinese broccoli, fresh shitake mushrooms, and green onions. The protein I used was fresh firm tofu. I would occasionally use fried tofu depending on what I had available. 

I decided today to use two types of seasoning - a vegetarian bouillon base that is flavored with mushrooms and an XO sauce.  The XO sauce is what makes it "almost" vegan because it contains minute amount of dried preserved scallops.

Heat up a wok to high heat until it begins to smoke. Add either peanut or olive oil to the wok until the oil smokes. Add the mushroom and the tofu and quickly stir-fry. The mushroom requires a liquid to fully cook so it is necessary to add some of the vegetarian bouillon until you have a nice glaze on the mushroom and tofu.

Remove and set aside. Head up the wok again and add a little oil and then the vegetables. Add liquid if necessary to cook the vegetable through and then add the rice noodles. 

Add the remaining bouillon and the XO sauce and quickly stir fry until the rice noodles have cooked through. Add the mushroom, tofu, and green onion back into the wok and quickly stir fry everything.

After 2-3 minutes it is fully cooked and ready to be served on a plate :)

Enjoy!!

Sunday, April 10, 2011

Spam Musubi


Spam musubi is one the reasons why my cholesterol was so high last year back in June when my wife and I visited Kaui for a week. If you look at the nutritional fact for Spam it is pretty scary. Check it out:

The reality of Spam it is high in saturated fat and sodium! So why eat it? Spam is one of those canned processed food items that many of us grew up on. It is quick to cook, rather inexpensive, and many of us would agree that it is tasty but we would not confess in public. The shelf life on a can of Spam is supposedly "indefinite" but will lose flavor over time. I had a can of Spam opened once and forgot to eat it 3 weeks later and it was still very tasty. Here it the quote from the Hormel website:

What is the shelf life of a Hormel Foods product in an unopened can? The processing techniques utilized by Hormel Foods makes the canned product safe for use indefinitely if the product seal remains intact, unbroken and securely attached to a can that has been well maintained. It is suggested that all canned products be stored in a cool and dry environment to keep the flavor adequately preserved. For maximum flavor it is recommended that the product be used within three years of the manufacturing date. After that period of time, the product is still safe to use however, the flavor gradually declines.
 
I'm vegan so what am I doing making Spam musubi?  I fell off the vegan wagon a month ago and I had leftover Spam that I wanted to document on the blog. I've been back on the vegan train a couple of weeks ago but decided to splurge on a rainy Seattle Sunday :)
 
Ingredients (makes 2 musubi for 1 serving)
2 tsp teriyaki sauce
4 oz sliced Spam - don't use the low sodium or low fat version. It's just now the same!
1 cup of cooked rice
2 sheets of dried seaweed
1 Spam musubi mold
 
There's really two ways to make this and I'm going to show you one of the methods. Take your mold and coated with oil to prevent sticking. You can purchase this mold from any decent Japanese grocery store.

Take a sheet of dried seaweed and cut it lengthwise. You can also cut a few strips of seaweed to place in between the rice and the Spam for added taste. I love the taste of dried seaweed! 

Place a sheet of the dried seaweed in the mold. The other method is to skip this step and place the rice in the mold without the seaweed and wrap it at the end. They both will work fine.

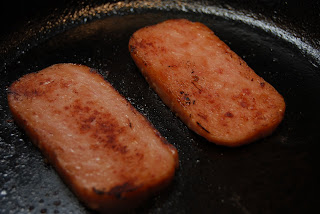
The two slices of the Spam and coat with teriyaki sauce. Heat out a frying pan to medium heat and cook the Spam slices for about 2 minutes on each side. You want a caramelized look to the Spam.
 
Place a slice spam in the mold on top of the seaweed.

Add a slice of seaweed on top of the Spam.  This is also optional. Then add a scoop of rice, fold the seaweed and press down on the mold.

Keep pressing down on the mold and remove the Spam musubi!

Slice the musubi in half and enjoy with beer or a cup of tea! You can do different variations by alternating the layer of rice and sushi in the mold.

 
Enjoy!!

Tuesday, January 11, 2011

Cassoulet with Duck Confit (and a Vegetarian Option)

Yesterday evening my wife, step-daughter and I went to Buckley's in Belltown to join Auburn club to watch the BCS Bowl. These fans in the SEC teams are "true" fanatics! I was fortunate to attend a football game a couple of months back where Auburn Tigers were playing an unranked team. The capacity of the stadium is about 87,500 and about 70,000 showed up. This was considered a slow game?!?! I never seen so many dedicated spectators in my life! Yesterday evening was no exception where the fans that showed up at Buckley's were very into the game. Since the game was Auburn Tigers versus the Oregon Ducks, I asked my wife if she would like duck for dinner today.  Her replied was only if we win.  During the last 3 seconds of the game, Auburn kicked the winning field goal and my mind was churning what should I cook for dinner?

On the drive home I was thinking of comfort food - cassoulet with duck confit.  I was never much of a bean person until I turned vegan. 
Duck confit is easy to make but can be labor intensive.  The method that I like to use is to use a wet brine first and then sous vide the meat for a minimum of 10 hours. I bought a couple of duck quarters at an Asian food store. Call me cheap but the cost of certain items can be 30-60% cheaper at an Asian grocery store with almost similar qualities.


I soaked the duck quarter in a 5% brine solution and added chopped garlic and fresh rosemary as an aromatic to the brine.  Some people would add brown sugar to the brine to sweeten it slightly. I normally don't use sugar for duck but will almost use it every time to brine turkey for roasting, smoking, or deep frying. 


To avoid bacteria growth I normally put the meat and the brine solution in the refrigerator for about 3 hours. Last night I started around 12:30am knowing that I'll stay until 3:30am finishing work from the office. I figure it was a good motivator to get my work done :)  Around 3:30am I was still wide awake and rinse off the brine from the duck quarters. I then covered them and put them back in the refrigerator. Here is the tricky part. It takes 10 hour to cook the duck confit so I needed to wake up a decent hour to start the sous vide :) 

The next morning when I was half asleep I seasoned it with a "secret" Cajun seasoning. It is one of the best seasoning to use for duck confit among other things.


I then took a duck quarter and place it in an individual foodsaver bag with frozen rendered duck fat about 3 tablespoon. This is required to cook the duck in its own fat to make it a confit.


It was then vacuum packed at the dry setting to get most of the air out using a foodsaver machine.


The method that I use to make the duck confit is using a sous vide supreme machine. It is almost foolproof. I have made duck confit in the past the traditional method in the oven and it doesn't come out as well.  My sous vide supreme is probably one of my top 3 appliances in the kitchen. I set the water bath to 176 degrees to cook the duck.


I placed each of the vacuum packed bags in the rack and dropped it in the water bath, cover it, and then waited 10 hours. 


I got home from work and started the cassoulet! I chopped some aromatics (minus carrots because I ran out)  - onions, celery, and chopped cooked Virginia ham I had in the fridge.


I cooked this mixture with a little olive oil in a pan for 8-10 minutes. This isn't exactly vegan but it smelled really really good :)


I took two canned white beans and drained all the liquid. I then added the beans to the aromatics and the ham. This was then cooked on the stove top for about 12 minutes. Sliced tomatoes and bread crumbs where then added on top and then placed in a pre-heated oven at 350 degrees for 15 minutes.

I started to make potatoes while the cassoulet was cooking on the stove top. I love Yukon gold potatoes cooked in rendered duck fat! Again, this is not quite vegan but the taste is amazing!


This is an easy recipe. Just add a couple of tablespoon of duck fan in a pan and then cook the sliced Yukon gold for about 3-4 minutes on each side. Add salt at the end to taste. Can we say yum???


I then sauteed some fresh spinach with olive oil and garlic salt for about 5 minutes on medium heat.


Take the pan off the heat to prevent the spinach from overcooking. Ever had overcooked spinach? Think back when you were in elementary school :) 

Since I'm still vegan (95% of the time), I lightly fried fresh tofu in duck fat with a light dusting of flour and salt for about 5 minutes on each side or until golden brown.


Okay, let's jump back to the duck confit. I took the confit out of the foodsaver bag and pour out all the excess oil and juice for use later. Here is the duck quarter right out of the bag after 10 hours. It's not really aesthically appealing but it is not done yet!


Take more duck fat and added it to the pan.  See the common theme here?  Set it to medium heat and cook the duck quarter for about 10 minutes on each side or until golden brown.  Now this looks a lot more appealing :)


I have made duck confit in the past using a blow torch to sear the outside. I find that searing it on the pan provides a more uniform color. Here is the completed dish. I didn't spend a lot of time on presentation but it tasted yummy nevertheless :)


If I were to do it again, I would make my own bread crumb. I was lazy this evening since I didn't have any stale bread and I was too tired to make it from scratch so I cheated.  Here is the cassoulet close up shot.


Spinach is interesting -- either you love it or hate it.  My step-daughter and I love it and my wife hates it :)


Here is my vegetarian version of the dish for myself with the tofu :)


It is not as pretty but just as wonderful to taste.

Enjoy!!

Monday, January 3, 2011

Cooking on a Himalayan Salt Block!

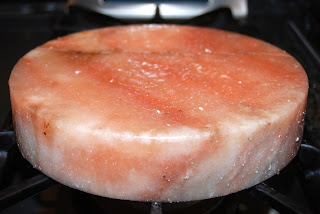
A couple of years ago my wife and I purchased a Himalayan salt block while on our honeymoon on a wine tasting trip in Napa Valley. We visited Dean & Deluca on our way to the French Laundry for dinner. We were quite intrigue when we saw the salt block and since we were had our car with us we purchased a circular block that was about 9 inch in diameter and about 1.75 inch in thickness.  It weighs about 15-20lbs and thought it might be fun to use this either to serve food or as we discovered tonight it could be used for cooking :) I found a great article about how to use a Himalayan salt block since I never used one before. 

What inspired me to use the salt block this evening was a couple of things.  My wife and I were discussing the next dinner party and thought about using beef as a theme for a vertical wine tasting. I dropped by Uwajimaya (Japanese grocery store) in Bellevue this afternoon and was browsing the meat department for no particular reason. I saw some beautiful Kobe style beef also known as Waygu beef (American Style Kobe Beef). It was well marbled and it was rib styled meat for $22/lb. True Kobe meat is quite expensive and the cows are known to be rubbed with Sake on the skin since they are prized animals in Japan.  We were fortunate to taste a true Kobe piece of steak at The HerbFarm a couple of years ago.  It was quite amazing!! I never seen any beef so marbled in my life! 

This evening I wanted to cook something simple -- Waygu slice of beef and shrimp. I figure I would use volunteer my wife and my step-daughter as guinea pigs. So far they have survived all my cookings and have not ended up in the hospital...yet :)

I heated the salt block directly on the gas stove starting at low heat for 10 minutes, medium heat for 10 minutes and finally high heat for 20 minutes. 


The photo above is the salt block heating on the gas stove before its first use. The photo below is after cooking the beef and shrimp.


The large crack on the salt block is actually more pronounced, lighter color changes, and definitely more pitted. I worry this would break over time!

The Waygu beef was pre-sliced so it made my life easier. I did not season the beef on purpose to see what it would taste like. The shrimp I did flavor with a light dash of Cajun seasoning. 


The first thing I did was lightly oiled the salt block with olive oil. The beef cooked almost instantly after placing it on the block. The optimal cooking time is about 30 secs on the first side and then about 15 secs on the flip side. Any longer then 30 secs total would over cook the beef. The shrimp takes a little longer about 2 minutes on the first side and then 1 minute on the flip side.


We noticed that the seasoned shrimp was perfect! The beef was a bit bland for the first couple of pieces and after that it was incredible. The beef was able to absorb the right amount of salt while cooking. I tried seasoning more beef at a later time but it was too salty when cooked. I think the key is cook a few slices of beef first and then it will start to bring out the salt on the block. We were quite happy with the first experiment!

The salt block was able to hold its heat for a good 20 minutes!  I like to try cooking vegetables and tofu the next time around for the vegan in me :)

Stay tuned for experiment #2!